Is your new Spring Hill home framed, wired, and piped, but still open to the studs? This is your best window to catch hidden issues before they become expensive surprises. You want everything built to plan and up to code, and you want confidence before the walls close. In this guide, you’ll learn when to schedule your pre-drywall walkthrough, what to check room by room, and how to document fixes so your builder can address them quickly. Let’s dive in.
What a pre-drywall walkthrough is
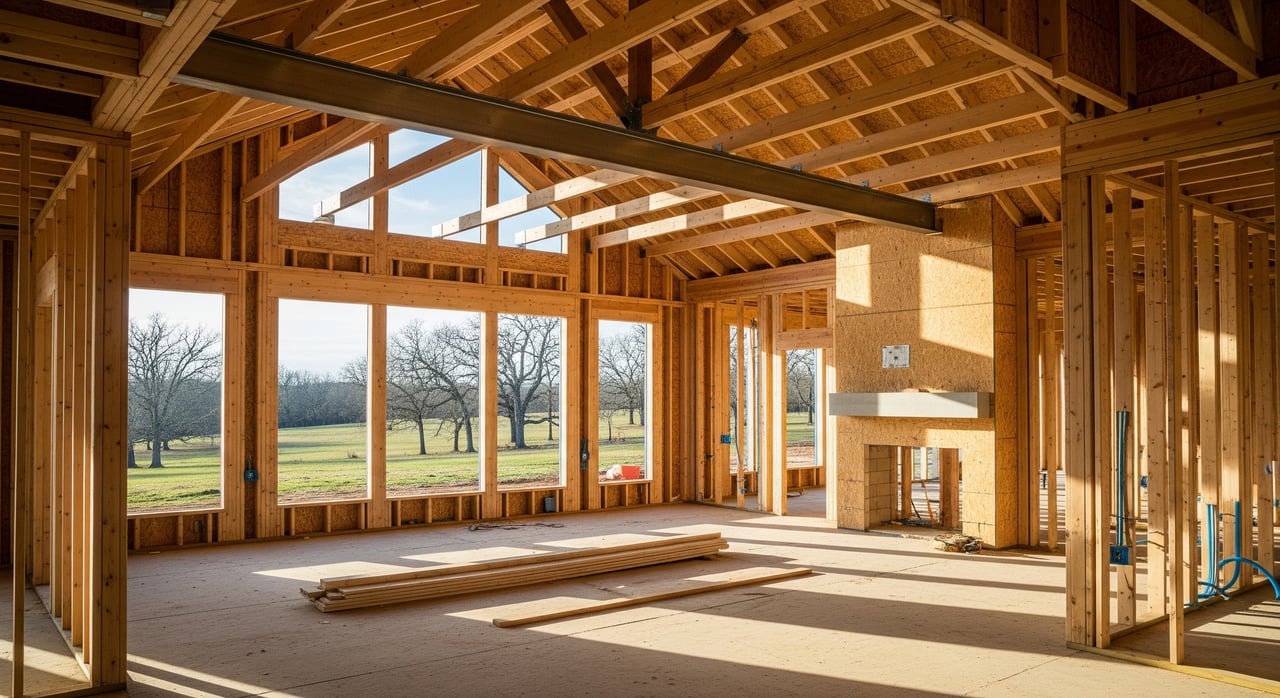
A pre-drywall walkthrough happens after framing and the rough plumbing, electrical, HVAC, windows, and doors are installed, but before insulation and drywall. You can see structural members, mechanical systems, and weatherproofing details while they are still visible. Your goal is to confirm the work matches your plans and local code requirements, and to flag anything that could lead to water intrusion, safety concerns, or costly rework.
When to schedule in Spring Hill
Plan your walkthrough after the builder finishes framing and rough-ins, and before insulation. Many builders schedule this right after, or around the same time as, municipal framing and rough-in inspections. Ask your builder for the expected timeframe, and confirm which jurisdiction applies, the City of Spring Hill or Maury County for unincorporated sites. Request copies of municipal inspection sign-offs so you know what has been approved and what still needs attention.
Who should attend
You, your builder or site superintendent, and, ideally, an independent home inspector with new-construction experience should attend. Some buyers also bring specialists for complex HVAC or plumbing systems. Review your contract for access rules, confirm the builder allows third-party inspectors, and follow any site safety requirements. A coordinated team makes it easier to resolve questions on the spot.
Local Spring Hill considerations
- Jurisdiction and permits: Confirm whether your home falls under the City of Spring Hill or Maury County, and what inspections have been completed. Ask for inspection records for framing, mechanical, electrical, plumbing, and insulation stages.
- Sewer or septic: Parts of Spring Hill are on municipal sewer, while more rural Maury County lots may use septic. Verify which system your lot uses and confirm any required rough-in or permitting is complete before drywall.
- Natural gas: If your home includes gas service, a pressure test and related approvals should be documented before lines are concealed.
- Flood and drainage: Some areas of Maury County may be in FEMA flood zones. If your lot is in or near a mapped zone, look closely at foundation details, drainage, and elevation elements visible at rough-in.
- Climate and moisture: Spring can bring heavy rain and humidity in Middle Tennessee. Proper flashing, housewrap, roof underlayment, and site grading are critical and should be visible now.
Your high-priority checklist
Use this section as your step-by-step review. Focus on life safety, structural integrity, water management, and mechanical systems first.
Structural and framing
- Verify framing aligns with the plans, including wall locations, bearing walls, and header sizes.
- Check roof truss layout against engineered drawings if available.
- Confirm proper fasteners are used and that hurricane or strapping ties are installed where required.
- Look for out-of-plumb walls, sagging, or uneven floor framing.
- Verify blocking, bracing, and fire-blocking or draft-stopping at soffits and top plates.
Exterior envelope and weatherproofing
- Housewrap should be continuous, with sealed seams and tight integration at all penetrations.
- Window and door flashing should be installed per manufacturer instructions, including sill, jamb, and head flashings.
- Sheathing should be fastened properly, with tight joints and taped seams if required by the product.
- Roof underlayment and flashing should be in place at penetrations, valleys, and vent stacks. Confirm the presence of drip edge where specified.
- Site grading should slope away from the foundation, with planned downspout extensions or drains visible or documented.
Plumbing rough-in
- Water supply lines must be supported, without kinks, and with accessible shutoffs where required.
- Drain lines should present proper slope and secure connections; look for clean penetrations and sleeves through framing and slabs.
- Gas lines, if present, should be supported and labeled. Ask to see proof of a successful pressure test.
- Confirm tub, shower, toilet, and sink rough-in locations and heights match the plans and fixture specifications.
- Review water heater location and T&P discharge routing. In flood-prone locations, confirm appropriate placement and any required protections.
Electrical rough-in
- Electrical boxes should be set to the correct depth for the planned drywall thickness and firmly secured.
- Cables should be stapled within code distances of boxes and protected with nail plates where they pass through stud edges.
- Confirm service equipment locations, including meter base and main panel, and verify working clearances are preserved.
- Walk each room to confirm switch, outlet, and lighting placement match plans and expected use.
HVAC rough-in
- Ducts should be properly sized, supported, sealed with mastic or approved tape, and insulated in unconditioned spaces.
- Verify equipment locations, platform sizes, and service clearances for furnaces and air handlers.
- Check condensate drain routing and auxiliary pans, especially in attic installations.
- Confirm return grille locations and return pathways are adequate for airflow.
- Note planned HVAC sizing, and if available, confirm it aligns with the design documentation.
Fire and safety systems
- Smoke and carbon monoxide detector wiring should be installed at required locations and interconnected.
- Confirm fire blocking and draft stopping in concealed spaces and around penetrations.
- Verify stair-related safety details, including proper blocking where handrails and guards will be attached.
Insulation and energy prep
- Air sealing should be planned at all penetrations, including around pipes, wires, and duct boots.
- Verify the continuity of the air barrier at rim joists, sill plates, and framing interfaces.
- Check window and door seals to ensure they are ready to receive insulation without voids.
Foundation, crawlspace, and slab
- Look for visible foundation cracks and verify anchor bolts and hold-downs are installed per plan.
- Confirm sill plates are pressure-treated where required and properly isolated from concrete.
- In crawlspaces, check for vapor barriers and the planned ventilation or conditioned design.
- At slabs, confirm penetrations are sealed and that any radon stub-outs or mitigation rough-in, if planned, are installed.
Documentation to request
- Plans and specifications used on site, including structural or truss drawings and manufacturer instructions for windows and roofing.
- Municipal inspection sign-offs for framing and all rough-ins.
- Model numbers for major systems and equipment, plus warranty documentation.
- Test records for gas pressure, and permits or approvals for sewer or septic systems.
Common issues and why they matter
- Missing or misapplied window flashing can allow water to enter wall cavities, which leads to rot and mold that are difficult to fix later.
- Incorrect drain slopes or loose waste connections can cause chronic backups and leaks hidden behind walls.
- Electrical boxes set too deep make safe device mounting difficult and can require wall repairs to correct.
- Incomplete fire-blocking or missing backing for rails and fixtures can fail inspections and delay drywall.
- Leaky or undersized ducts reduce comfort and efficiency. Repairs after drywall often require cutting into finished spaces.
- Housewrap gaps and roof flashing misses invite moisture during and after construction.
- Poor site grading can cause water to collect near the foundation, leading to settlement or moisture intrusion.
The cost to correct most of these items rises sharply once insulation and drywall are installed. Catching them now saves time, money, and headaches.
How to prepare and document
- Hire the right inspector: Seek an independent inspector experienced in new construction and familiar with local codes. For complex systems, consider an HVAC or plumbing specialist.
- Coordinate early: Confirm the pre-drywall window with your builder and ask whether municipal inspections will occur before or near your walkthrough.
- Bring the essentials: Your contract, plans and specs, a flashlight, tape measure, and a checklist organized by system. Use your smartphone for clear, date-stamped photos.
- Document precisely: Note locations and details, such as “missing sill flashing at west bedroom window, 3-inch gap at bottom.” Share a written punch list promptly and ask for written confirmation and timelines for corrections.
- Ask smart questions: Request explanations for any deviations from the plans, and ask to review inspection sign-offs.
- Consider add-ons now: If you want a passive radon rough-in or termite protections like shields or treated components, this is the easiest stage to add them.
- Verify fixes: After corrections and insulation, confirm completion before drywall. Your inspector can perform a follow-up check if needed.
Working with a local advisor
A seasoned local advocate helps you focus on what matters, navigate municipal requirements, and keep your builder relationship positive and productive. With builder-side experience and on-the-ground knowledge of Spring Hill and greater Maury County, we help you schedule the right inspections, read plan details, and organize a clear punch list that gets addressed before walls close. If you want a calm, well-run process from framing to finish, reach out to Susan Gregory to get started.
FAQs
What is a pre-drywall walkthrough?
- It is a buyer review after framing and rough mechanicals are complete, but before insulation and drywall, to verify work matches plans and code and to flag needed fixes.
When should I schedule it in Spring Hill?
- Plan it after the builder completes framing and rough-ins and around municipal rough-in inspections, but before insulation is installed.
Do I need an independent inspector?
- It is recommended to bring an inspector with new-construction experience to provide an impartial checklist and documentation of issues.
What local permits should be complete before drywall?
- Confirm framing, mechanical, plumbing, and electrical rough-in inspections are passed, and verify gas pressure tests and sewer or septic approvals as applicable.
How do flood zones affect my walkthrough?
- If your lot is in or near a FEMA flood zone, pay special attention to foundation elevation, drainage, and moisture control details visible at rough-in.
What if the builder resists a correction?
- Document the issue with photos and plan references, submit a written punch list, and request written timelines; your agent can help coordinate resolution within the contract.